Glazed Berry Pie

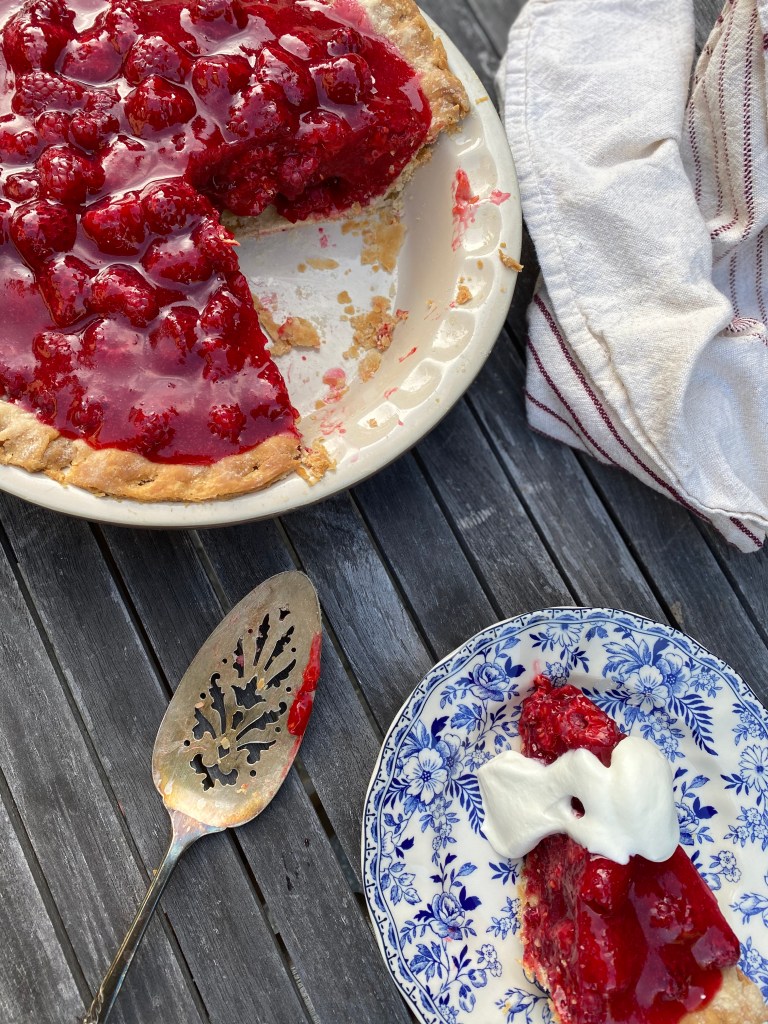
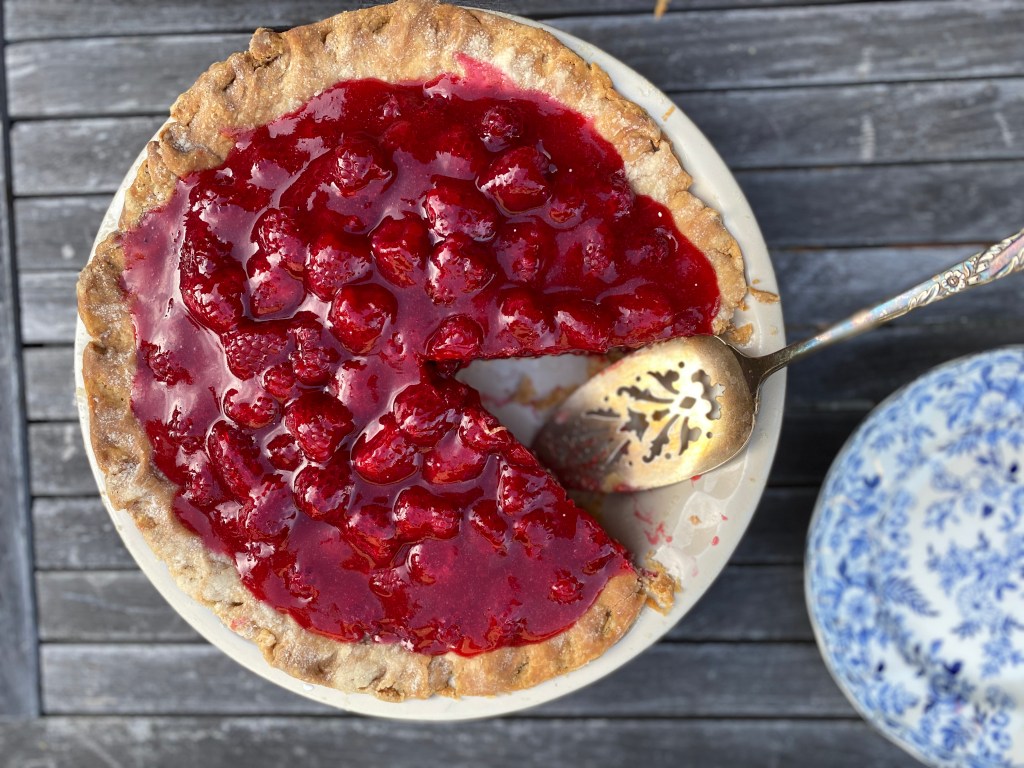
After a 3.5 year hiatus, it is time to get back into the swing of posting recipes for you. As I’m sure you all know, it is finally berry season again and so a few weeks ago, with a sale on fresh raspberries afoot, my mom and I got together to make one of our seasonal favourite family recipes: this glazed berry pie.

This recipe originated many years ago from the mother of a very dear friend of my parent’s in Liverpool, Nova Scotia. It is a fresh berry pie and requires a blind baked pie shell. I’m not including a pastry recipe here, as most people have their own, but I have been using a buttery pastry recipe from a community-loved baker, Jana Roerick, on Saltspring Island (where I am from). If you are interested in her cookbook, A Little Island Bake Shop, check out www.janasbakeshop.ca.

My Nikon battery was charging and we were feeling hungry so the photo quality is not quite up to par for me. Hopefully the iPhone photos are still appetizing enough that you give this delightful recipe a go.

INGREDIENTS

1 quart strawberries or raspberries, cleaned and hulled

3/4 cup sugar

2 1/2 tablespoons cornstarch

1/4 teaspoon salt

1 cup water

1 pie crust, baked and allowed to cool to room temperature

DIRECTIONS

Reserve and blend or sieve 1 cup of the fruit. If making with raspberries, the seeds should be separated from the blended reserved fruit using a sieve.

Combine the sugar, cornstarch, salt and water in a saucepan. Cook stirring until thickened over low hear 10-15 minutes. Add blended fruit to give colour.

Put whole berries into baked pie shell. Pour syrup over berries, coating them thoroughly.

Chill for at least 4 hours to allow glaze to set. Serve with whipped cream.

Flourless Chocolate-Prune Cake

I came across the idea for this recipe quite by accident on David Lebovitz’s website. I am always a sucker for a flourless chocolate cake and, being intrigued by the notion of a reduced amount of processed sugar in exchange for the natural sugar of the prunes, I decided to give it a try.  I used the chocolate that I had in the house, some “dark” chocolate from Callebaut (about 7 ounces) and some bittersweet chocolate from Scharffen Berger for the balance.

DSC_0016.jpeg

Although the original recipe called for the prunes to be chopped finely before being plumped in the rum, I chose to cook the prunes whole in the rum and then purée the cooked prunes and remaining rum juice with an immersion blender. In large measure this was because my household includes a rather fussy eight year old that doesn’t like finding chunks of anything but chocolate in his chocolate cake but I also had a sense that I would prefer the prunes to be more subtle ingredient in the cake.

By accident, I only put in half the butter (6 tablespoons as opposed to 12) called for in the original recipe but fortunately it still produced an acceptable result. My changes resulted in an almost mousse-like texture that I really enjoyed.

The cake is very moist, which makes for a challenge when trying to obtain clean cut slices. By dipping the knife in very hot water and then wiping it between each cut, you can get very good looking slices. I served the cake with unsweetened whipped cream. If I had it on hand, I would love it with creme fraiche.

For the prunes:

6 ounces (170g) pitted prunes

1/3 cup ( 80 ml) rum, or another liquor that appeals to you

1 tablespoon sugar

For the cake:

12 ounces (340g) bittersweet or semisweet chocolate coarsely chopped

6 tablespoons (3 ounces, 170g) unsalted butter, cubed

6  large eggs separated

large pinch of salt

3 tablespoons sugar

Additional soft butter and flour, or cocoa powder, for preparing the pan

Preheat the oven to 325ºF (165ºC).

Simmer the prunes with the rum and 1 tablespoon of sugar in a small saucepan for a few minutes, until most of the liquid is absorbed. Remove from heat, cover, and let stand until cool.

Butter a 9-inch (23cm) springform pan. Dust the inside with flour or cocoa powder, and tap out any excess. I prefer to use cocoa for this.

In a large bowl set over a pan of simmering water, melt the chocolate and butter, stirring until smooth. Remove from heat and stir in the puréed prunes.

Gently beat the egg yolks and stir into the chocolate mixture.

In a separate bowl, or using a stand mixer, whip the egg whites with the salt until they begin to hold soft peaks. Continue whipping, adding the 3 tablespoons of sugar, one tablespoon at a time, until the whites hold their shape when you lift the whip.

Fold one-third of the beaten egg whites into the chocolate mixture thoroughly, then gently fold in the remainder a third at a time  just until no streaks of whites are visible. Don’t overfold.

Bake the cake for up to 40 to 45 minutes, or until the cake feels set close to the edges of the pan but the center is still rather soft to the touch and moist-looking. Mine took only half an hour to reach this stage, so keep a close eye on it!

Allow to cool. Run a thin knife around the cake to loosen it from the pan and remove the ring of the springform. The cake will keep for a couple of days, or if carefully wrapped it is suggested that it can be kept for up to 2 months in the freezer. (I can’t imagine getting it off the springform base intact to wrap it.)

Guinness Chocolate Cake with Salted Caramel Glaze

This is one of my favourite cakes to make for a grown-up birthday or celebration. It is delicious and sophisticated without all the fuss of icing a cake. What’s even more helpful about it is that, with the benefit of a dense crumb, it cuts well making it easy to serve.

I don’t have a bundt pan, so I use a deep round pan which poses some challenges: I have to cook the cake at 300F for a much longer time period which seems different each time I make it. I also never have the luxury of letting the cake rest for a day before glazing it as suggested in the recipe. What I find works just as well is to make the cake the day before it is needed and glaze it that same day, then allowing it to rest overnight in a cool spot. Consequently, it is ready for me to take into the office the next morning and the chocolate flavour has had the time it needs to develop.

I’ve seen similar recipes from a variety of sources but this is taken from The Hungry Housewife.

Guinness Chocolate Cake with Salted Caramel Glaze DSC_0013

Cake

1 c. Guinness Stout

1 c. butter

¾ c. unsweetened cocoa powder plus a little for dusting the pan

2 c. all-purpose flour

2 c. sugar

½ tbsp.. baking soda

½ tsp. salt

2 large eggs

¾ c. sour cream

1 tsp. vanilla extract

Preheat oven to 350 F.

Butter a bundt pan (I use a deep cake pan but it takes about twice as long to cook at I do so at 300 F). Sprinkle some cocoa powder in the pan, hold it over a sink, and turn and tilt the pan to distribute the flour evenly. Then invert the pan and tap out the excess cocoa.

In a medium saucepan over medium heat, bring the Guinness and butter to a light boil, add the cocoa powder and whisk until smooth. Remove from heat and set aside.

In a large bowl, whisk flour, sugar, baking soda and salt.

In another bowl beat together the eggs, sour cream and vanilla.

Add the butter/Guinness mixture to the sour cream mixture and beat until just incorporated. Add the flour mixture and beat until just combined. Then using a rubber spatula, lightly fold the batter to make sure there are no pockets of flour. Pour into bundt pan.

Bake for 55-60 minutes or until a toothpick comes out with only a few crumbs.

Allow to cool in pan for 10 minutes.

Salted Caramel Glaze

5 tbsp. butter

½ c. packed dark brown sugar

⅓ c. heavy cream

pinch sea salt

¼ tsp. vanilla extract

⅔ c. powdered sugar,sifted

Pinch of Fleur de Sel (if desired)

In a medium saucepan, bring the butter, dark brown sugar, heavy cream and salt to a rolling boil. Boil for one minute, stirring constantly. Remove from heat, stir in vanilla extract. Add about ½ cup of the powdered sugar and whisk until smooth. Continue to whisk in powdered sugar by the tablespoon until you reach your desired consistency.

Place on a cake plate and pour the salted caramel glaze over the top.

If desired, sprinkle Fleur de Sel over the glaze.

DSC_0029


Cranberry Orange Scones

You may have noticed that I am a big fan of scones. A dear friend and I came across this recipe on the blog The Pioneer Woman and have been wanting to make it ever since, but time has not been on our side. After telling my mother about the recipe, she made it on a recent morning to share with my classmates. It was a huge hit and I became more determined to make it myself and share it here. It is easy to put together. The glaze really takes these scones above and beyond your everyday scone. For a larger group, you can make 2 small rounds, still cutting each into 8 equal portions or simply double the recipe.

I wasn’t able to find white whole wheat flour anywhere, so I just used an organic whole wheat flour. I also used salted butter because that was what I had. The result was still delicious.


Cranberry Orange Scones - A Pat & A Pinch

The Scones

1/2 cup chilled unsalted Butter

1 cup all-purpose flour

1 cup white whole wheat flour (or whole wheat flour)

2 teaspoons baking powder

1/4 teaspoon baking soda

1/2 teaspoon salt

1/3 cup packed brown sugar

1/2 teaspoon cinnamon

zest of 2 large oranges

1/2 cup buttermilk

1 tablespoon freshly squeezed orange juice

1 teaspoon pure vanilla extract

1 large egg, lightly beaten

2/3 cup dried cranberries

The Glaze

1 1/4 to 2 cups icing or powdered sugar

2 tablespoons freshly squeezed orange juice

zest of 1 large orange

2 teaspoons pure vanilla extract

1/4 teaspoon freshly grated nutmeg

The Scones

Preheat oven to 425°F (400°F if using a convection oven). Line a baking sheet with parchment paper and set aside.

In a medium bowl, stir together flours, baking powder, baking soda, salt, brown sugar, cinnamon, and orange zest, breaking up any clumps of zest.

Mix together the buttermilk, orange juice, vanilla, and egg in a 2 cup measure or a small bowl. Set aside.

Cut the chilled butter into 1/4 to 1/2 inch cubes. With a rigid pastry blender or two knives, cut in the chilled butter until the mixture resembles coarse meal with some pea-sized pieces. Add the cranberries and mix in, breaking up any clumps of the cranberries. Make a well in the center, and then add the liquid ingredients. Stir just until combined, taking care to not over mix. Try to work quickly so that the butter in the dough stays as cold as possible. If the dough gets too warm, the scones will lose their shape more easily in the oven and have a more relaxed appearance with less defined edges.

Transfer the dough to a lightly floured work surface. Working quickly, gently fold the dough on itself pressing it together to incorporate any dry bits that are not holding together. Do not over work the dough. Just make sure it is holding together nicely. Shape the dough into a 7-inch diameter circle and cut into 8 wedges. Transfer the wedges to the prepared baking sheet. Bake until the scones are puffed and golden brown, about 10- 14 minutes. Remove the sheet from the oven and let the scones sit on it for a minute before removing to a wire rack to cool.

The Glaze

While the scones are still slightly warm, prepare the glaze. Combine the juice, zest,vanilla and nutmeg in a small bowl. Begin to whisk in the sugar 1/4 cup at a time to achieve a smooth consistency that you will be able to drizzle over the scones, but which is not too runny. Although the original recipe specified 2 cups of sugar, I stopped at 1 1/4 cups of sugar and it worked perfectly. If your glaze is suddenly too stiff, whisk in another teaspoon of freshly squeezed orange juice. Drizzle as much of the glaze as you desire over the scones. Allow the glaze to set completely, then serve and enjoy!

Ginger, Hazelnut and Blackberry Biscuits with Fennel Sugar

There is nothing like a good biscuit or scone. When I came across this recipe on the blog Twig Studios, I was intrigued.  It brings together so many flavours that I love; blackberries, ginger, lemon and fennel. The result was fantastic – with a nice texture these biscuits are nutty, sweet, and savoury at the same time. Spread with a little butter, they are even better!

DSC_0093

The recipe is much more complex that the buttermilk biscuits that I usually make in both in the number of ingredients and the method, but the good news is that it works. To make the fennel sugar, you have to plan in advance. Combine about one teaspoon of fennel seeds in a jar of sugar to infuse the flavour for about two weeks prior to making the recipe. If you don’t have the patience to do this in advance, just break up the fennel seeds with a mortar and pestle, combine with the sugar, and move on.

I made some adjustments increasing the amount of both blackberries and candied ginger, and found that I needed more buttermilk than the original recipe suggested to get the dough to come together.

This recipe made a dozen generous biscuits.  I’d suggest cutting it in half if you don’t anticipate being able to use them all the same day that they are made – they are very filling and so much better fresh!

Gingered Fennel, Hazelnut and Blackberry Biscuits

1/2 cup 115g cold unsalted butter

1 1/2 cups 150g old fashioned rolled oats plus more for garnish

1 3/4 cups all purpose flour

1/4 cup ground flaxseed

1/2 cup plus 1 tbsp fine grain turbinado or granulated sugar with 1 teaspoon fennel seeds (see comment above).

1 tsp baking powder

1 tsp baking soda

1 tsp salt

1/2 cup chopped unblanched hazelnuts with their skins plus more sliced for garnish

6 ounces  blackberries

grated zest of one lemon

about 1 cup plus 6 tbsp shaken buttermilk

5 tbsp chopped candied ginger

Preheat the oven to 400F. Line baking sheets with baking paper or silpats.

Cut the butter into small cubes and place on a plate in the freezer.

In the bowl of a food processor fitted with the metal blade grind 3/4 cup of the oats until it is a fine meal, then add the flour and ground flaxseed, 1/2 cup of the fenneled sugar, baking powder and soda and salt and pulse a few times to combine. Add the remaining 3/4 cup 75g rolled oats, the hazelnuts and cubed butter pulsing and additional 7 to 9 times or until the butter pieces are pea sized.

Turn the mixture into a large bowl and add the lemon, ginger, and blackberries tossing gently to mix. Then pour in half the buttermilk and, using a bowl scraper or a spatula, gently mix the mixture adding enough buttermilk until a rough ragged dough comes together (you may not need all of the buttermilk). Hold back just enough of the buttermilk to brush the tops of the biscuits later.

Turn the dough onto a lightly floured surface and shape into a flat rectangle about one inch thick. Using a sharp knife, cut into triangles or squares. Brush the tops with the remains of the buttermilk and sprinkle over the remaining tablespoon of fenneled sugar, oats and sliced hazelnuts

Bake for about 20 minutes until evenly browned.

DSC_0071


Candied Yams with Orange Bitters

I have to admit upfront that I am not a big fan of yams or sweet potatoes, but I keep hoping that I will find a recipe that changes my perspective.  Although my guests raved about these, to me they are still yams.  Accordingly, if you don’t like yams or sweet potatoes, this recipe might not change your opinion, but if you are already a lover of these tubers, you might enjoy this interesting sweet and salty spin.

A Pat and A Pinch - Candied Yams With Orange Bitters

The recipe as written serves 6-8 as a side dish and is very attractive to serve. It is based on a recipe by Ruth Reichel, an editor of Gourmet magazine for many years and published in Gourmet Today, a selection from the now defunct magazine. Epicurious has an adaptation of it as does the blog Drool-Worthy. Having read comments that it was very sweet with the suggested 1/3 cup of sugar, I cut back on the sugar and the sweetness seemed perfect.  The recipe below reflects this change.

Candied Yams with Orange Bitters

1-1/2 cups orange juice

1/4  cup brown sugar

1/4  cup red wine vinegar

1/4 cup orange bitters

1-1/2 tablespoon olive oil

1/4 tsp salt

4-5  yams or sweet potatoes, unpeeled, halved and then cut into wedges (about 3 lbs)

1/2 teaspoon dried red chili flakes

1 teaspoon ground sea salt

10 whole thyme sprigs plus the leaves of 5 thyme sprigs

2 heads of garlic, skin left on, sliced in half

Preheat the oven to 425°F. Prepare a 12 by 16 inch baking sheet with sides or a roasting pan of a similar size by lining it with foil or parchment.  This isn’t essential but makes clean-up so much easier.

Place the orange juice in a saucepan with the sugar and vinegar. Bring to a boil over high heat, then turn down the heat to medium-high and simmer fairly rapidly for about 20 minutes, until the liquid has thickened and reduced to scant 1 cup (about the amount in a large glass of wine).  Remove from the heat and add the bitters, olive oil, and 1/2 teaspoon salt.

Place the potatoes in a mound in the centre of the lined baking sheet, add the chili flakes,  the 10 thyme sprigs, and garlic halves, and then drizzle the reduced sauce over the mound. Toss well so that everything is coated and then spread the mixture out in a single layer on the sheet. I found that the garlic halves are quite delicate and need to be tossed quite gently. Grind about 1 tsp of sea salt to taste over the wedges.

Place in the oven and roast for 40 to 60 minutes, turning and basting the potatoes every 15 minutes or so. They need to remain coated in the liquid in order to caramelize, so  if the pan is drying out too much you can add a little more orange juice. If the caramelization seems to be happening more quickly than the yams are cooking, reduce the heat by 25°F. At the end, the potatoes should be dark and sticky but not burnt. Remove from the oven and leave to cool slightly before arranging on a platter and sprinkling with the fresh thyme leaves.