Pâté de Campagne

Two Christmases ago, our family flew back East to the Big Apple to spend the holiday with my beloved Auntie Rboo.  Her friend Hetty arrived for a Christmas feast with this pâté and in the blink of an eye it was gone.  Naturally, we HAD to have the recipe.

Fast forward two years and we finally decided it was time to recreate this cholesterol laden magic.  It turns out that the recipe came from Epicurious and was not a family secret as the flavour had suggested.  The Epicurious recipe creates far too much pâté for our household to eat, so I have reduced the recipe by 2/3.  Comments on the website suggest that if you make the full shebang, it freezes well (either before or after cooking).  Another tempting suggestion was to include chopped pistachios.

In any case, we ate this on crusty white bread with cornichons as an appy on Christmas day and again as fried slices with farm fresh eggs for breakfast.  Both were a treat and I have no doubt you will enjoy this immensely no matter how you serve it!

A Pat & A Pinch - Pâté de Campagne

1/4 cup Cognac
1 tablespoon unsalted butter
1/3 cup minced onion
3/4 pound ground pork
4 ounces bacon (approx. 3 slices), finely chopped
8 bacon slices
1 garlic clove, pressed
1 teaspoon salt
1 teaspoon dried thyme
1/2 teaspoon ground allspice
1/3 teaspoon freshly ground black pepper
1 large egg, lightly beaten
2 tablespoon whipping cream
1 1/4 inch thick slice Italian cotto ham to fit the dimensions of pan
1 teaspoon Coarse sea salt

fullsizeoutput_2a9

Set rack at lowest position in oven and preheat to 350°F. Boil Cognac until reduced to about 2 tablespoons. Cool.

Melt butter in heavy medium skillet over medium heat. Add onion and sauté until soft and translucent but not brown, about 8 minutes.
Combine ground pork and chopped bacon in large bowl. Using hands, mix together until well blended.

Add sautéed onion, garlic, salt, thyme, allspice, and pepper to bowl with pork mixture and stir until incorporated. Add egg, cream, and reduced Cognac. Stir until well blended.
Line 8x4x2.5-inch metal loaf pan with bacon slices, arranging slices across width of pan and lastly halved slices on each short side of pan and overlapping pan on all sides. Using hands, lightly and evenly press half of meat mixture  onto bottom of pan atop bacon slices. Place ham over in single layer. Top with remaining meat mixture.
Fold the standing ends of the bacon slices over. Cover pan tightly with foil. Place pan in a larger baking pan or roast pan and transfer to oven. Pour boiling water into larger pan to come halfway up sides of loaf pan creating a water bath. Bake pâté until a thermometer inserted through foil into center registers 155°F, about 2 hours minutes.

Remove loaf pan from baking pan and transfer to rimmed baking sheet. Place another loaf pan on top with some heavy cans inside to weigh down pâté.  Chill overnight.  Can be made about 4 days ahead.

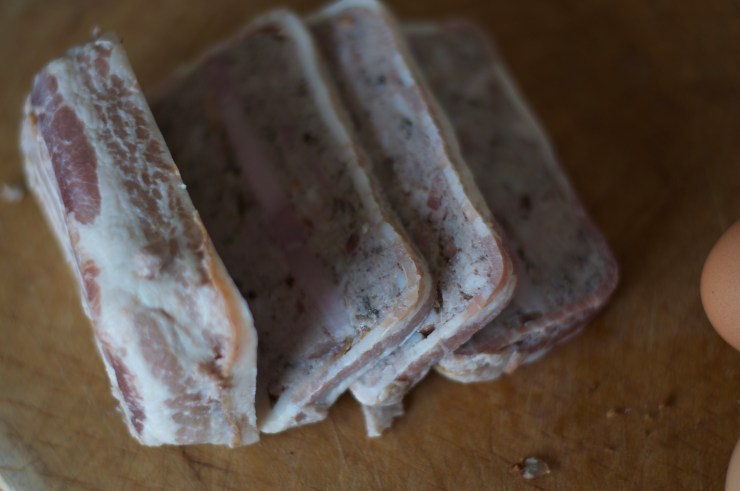
To serve, place loaf pan with pâté in larger pan of hot water for about 3 minutes. Invert pâté onto platter; discard fat from platter and wipe clean. Cut pâté crosswise into slices.  Slices can be fried in a bit of butter if you are serving them with eggs for breakfast.

Cranberry Orange Scones

You may have noticed that I am a big fan of scones. A dear friend and I came across this recipe on the blog The Pioneer Woman and have been wanting to make it ever since, but time has not been on our side. After telling my mother about the recipe, she made it on a recent morning to share with my classmates. It was a huge hit and I became more determined to make it myself and share it here. It is easy to put together. The glaze really takes these scones above and beyond your everyday scone. For a larger group, you can make 2 small rounds, still cutting each into 8 equal portions or simply double the recipe.

I wasn’t able to find white whole wheat flour anywhere, so I just used an organic whole wheat flour. I also used salted butter because that was what I had. The result was still delicious.


Cranberry Orange Scones - A Pat & A Pinch

The Scones

1/2 cup chilled unsalted Butter

1 cup all-purpose flour

1 cup white whole wheat flour (or whole wheat flour)

2 teaspoons baking powder

1/4 teaspoon baking soda

1/2 teaspoon salt

1/3 cup packed brown sugar

1/2 teaspoon cinnamon

zest of 2 large oranges

1/2 cup buttermilk

1 tablespoon freshly squeezed orange juice

1 teaspoon pure vanilla extract

1 large egg, lightly beaten

2/3 cup dried cranberries

The Glaze

1 1/4 to 2 cups icing or powdered sugar

2 tablespoons freshly squeezed orange juice

zest of 1 large orange

2 teaspoons pure vanilla extract

1/4 teaspoon freshly grated nutmeg

The Scones

Preheat oven to 425°F (400°F if using a convection oven). Line a baking sheet with parchment paper and set aside.

In a medium bowl, stir together flours, baking powder, baking soda, salt, brown sugar, cinnamon, and orange zest, breaking up any clumps of zest.

Mix together the buttermilk, orange juice, vanilla, and egg in a 2 cup measure or a small bowl. Set aside.

Cut the chilled butter into 1/4 to 1/2 inch cubes. With a rigid pastry blender or two knives, cut in the chilled butter until the mixture resembles coarse meal with some pea-sized pieces. Add the cranberries and mix in, breaking up any clumps of the cranberries. Make a well in the center, and then add the liquid ingredients. Stir just until combined, taking care to not over mix. Try to work quickly so that the butter in the dough stays as cold as possible. If the dough gets too warm, the scones will lose their shape more easily in the oven and have a more relaxed appearance with less defined edges.

Transfer the dough to a lightly floured work surface. Working quickly, gently fold the dough on itself pressing it together to incorporate any dry bits that are not holding together. Do not over work the dough. Just make sure it is holding together nicely. Shape the dough into a 7-inch diameter circle and cut into 8 wedges. Transfer the wedges to the prepared baking sheet. Bake until the scones are puffed and golden brown, about 10- 14 minutes. Remove the sheet from the oven and let the scones sit on it for a minute before removing to a wire rack to cool.

The Glaze

While the scones are still slightly warm, prepare the glaze. Combine the juice, zest,vanilla and nutmeg in a small bowl. Begin to whisk in the sugar 1/4 cup at a time to achieve a smooth consistency that you will be able to drizzle over the scones, but which is not too runny. Although the original recipe specified 2 cups of sugar, I stopped at 1 1/4 cups of sugar and it worked perfectly. If your glaze is suddenly too stiff, whisk in another teaspoon of freshly squeezed orange juice. Drizzle as much of the glaze as you desire over the scones. Allow the glaze to set completely, then serve and enjoy!

Ginger, Hazelnut and Blackberry Biscuits with Fennel Sugar

There is nothing like a good biscuit or scone. When I came across this recipe on the blog Twig Studios, I was intrigued.  It brings together so many flavours that I love; blackberries, ginger, lemon and fennel. The result was fantastic – with a nice texture these biscuits are nutty, sweet, and savoury at the same time. Spread with a little butter, they are even better!

DSC_0093

The recipe is much more complex that the buttermilk biscuits that I usually make in both in the number of ingredients and the method, but the good news is that it works. To make the fennel sugar, you have to plan in advance. Combine about one teaspoon of fennel seeds in a jar of sugar to infuse the flavour for about two weeks prior to making the recipe. If you don’t have the patience to do this in advance, just break up the fennel seeds with a mortar and pestle, combine with the sugar, and move on.

I made some adjustments increasing the amount of both blackberries and candied ginger, and found that I needed more buttermilk than the original recipe suggested to get the dough to come together.

This recipe made a dozen generous biscuits.  I’d suggest cutting it in half if you don’t anticipate being able to use them all the same day that they are made – they are very filling and so much better fresh!

Gingered Fennel, Hazelnut and Blackberry Biscuits

1/2 cup 115g cold unsalted butter

1 1/2 cups 150g old fashioned rolled oats plus more for garnish

1 3/4 cups all purpose flour

1/4 cup ground flaxseed

1/2 cup plus 1 tbsp fine grain turbinado or granulated sugar with 1 teaspoon fennel seeds (see comment above).

1 tsp baking powder

1 tsp baking soda

1 tsp salt

1/2 cup chopped unblanched hazelnuts with their skins plus more sliced for garnish

6 ounces  blackberries

grated zest of one lemon

about 1 cup plus 6 tbsp shaken buttermilk

5 tbsp chopped candied ginger

Preheat the oven to 400F. Line baking sheets with baking paper or silpats.

Cut the butter into small cubes and place on a plate in the freezer.

In the bowl of a food processor fitted with the metal blade grind 3/4 cup of the oats until it is a fine meal, then add the flour and ground flaxseed, 1/2 cup of the fenneled sugar, baking powder and soda and salt and pulse a few times to combine. Add the remaining 3/4 cup 75g rolled oats, the hazelnuts and cubed butter pulsing and additional 7 to 9 times or until the butter pieces are pea sized.

Turn the mixture into a large bowl and add the lemon, ginger, and blackberries tossing gently to mix. Then pour in half the buttermilk and, using a bowl scraper or a spatula, gently mix the mixture adding enough buttermilk until a rough ragged dough comes together (you may not need all of the buttermilk). Hold back just enough of the buttermilk to brush the tops of the biscuits later.

Turn the dough onto a lightly floured surface and shape into a flat rectangle about one inch thick. Using a sharp knife, cut into triangles or squares. Brush the tops with the remains of the buttermilk and sprinkle over the remaining tablespoon of fenneled sugar, oats and sliced hazelnuts

Bake for about 20 minutes until evenly browned.

DSC_0071


Pumpkin Seed and Chocolate Chip Cookies

My son needed some cookies for his school lunches and I really wanted to make something a little new for a change. With pumpkin season upon us, he has been keen to roast pumpkin seeds, so I thought the addition of pumpkin seeds to a chocolate chip cookie might fit the bill. I came across a recipe for Seeded Chocolate Chip Cookies by Martha Rose Schulman at the New York Times, and adapted it to what I was looking for.

Pumpkin Seed and Chocolate Chip Cookies

I love the result; the pumpkin seeds add a lovely crunch to the texture of the cookies, the oatmeal is scant enough that they are not like an oatmeal cookie but still have the benefit in their texture, and there is a lot of chocolate for my little chocolate lover. With my scoop, I got two dozen cookies from this recipe. Next time, I might double the recipe!

Pumpkin Seed and Chocolate Chip Cookies

6 tablespoons/48 grams whole-wheat flour

2 tablespoons ground flax seeds*

½ cup/65 grams all-purpose flour

½ teaspoon/2 grams baking soda

½ cup (1 stick)/ 115 grams unsalted butter, at room temperature

¼ cup/50 grams granulated sugar

½ cup/80 grams packed light brown sugar

1 egg

1 teaspoon vanilla/5 milliliters

¼ cup/100 grams pumpkin seeds

½ cup (scant)/50 grams rolled oats

½ teaspoon coarsely ground sea salt

1 cup/225 grams chocolate chips (or more if desired)

* If you don’t have flax seeds on hand, you can substitute with an equivalent amount of whole-wheat flour, hemp hearts, or wheat germ.

Heat oven to 350 degrees Farenheit with racks adjusted to the lower third and middle of the oven if your oven is large enough to take 2 sheets at a time. Line two baking sheets with parchment paper.

Stir the flours, ground flax seed and baking soda in a bowl and set aside.

In bowl of a standing mixer fitted with the paddle attachment, cream butter until lemony yellow, about 2 minutes. Scrape down sides of the bowl and paddle. Add the sugars. Continue creaming mixture on medium speed until it is lump free, about 1 minute. Stop mixer and scrape down sides of the bowl and the paddle.

Add the egg and vanilla and beat until fully incorporated. Scrape down sides of the bowl and paddle.

On low speed, add sifted flour mixture. Beat slowly until all of the flour mixture is incorporated. Scrape down sides of bowl. Add the seeds, oats, chocolate chips and salt and mix in.

Spoon dough by heaped tablespoons or a scoop at least 2 inches apart onto the prepared baking sheets.

Bake 9 to 14 minutes, depending on your oven, until lightly browned, turning the baking sheets from front to back halfway through the baking. If you cook two sheets at the same time, also rotate them from top to bottom and vice versa.

Remove from oven and slide parchment off the baking sheet and onto a work surface. Allow cookies to cool for at least 10 minutes before serving, or for at least 20 minutes before storing in an airtight container.

Chocolate Chip Cookie Dough Decadence

My son began first grade this week and I wanted to celebrate with a new treat for his lunch box.  Chocolate is a favourite of his and cookie dough is a highly prized item in his food choices, so these bars seemed like the perfect idea. They are adapted from a contribution to The Food Recipe Critic that was, in turn, adapted the recipe from Lifes Simple Measures, the major difference being that these are nut-free.

These bars were a huge hit, even with my dad who began as a sceptic, but they won’t be going in any lunch boxes as they wouldn’t survive the ordeals that lunchbox items must be prepared to endure.

I was a little concerned that the dough might be too soft, so I was careful about the amount of sweetened condensed milk that I added. In the end, I chose not to scrape out the can of condensed milk, leaving a good tablespoon in the can. Even at that, the dough is quite soft when not fully chilled. Consequently, I wouldn’t serve these bars on a hot day when they had to sit out of the fridge for any time.

Chocolate Chip Cookie Dough Decadence - A Pat & A Pinch

In Canada, sweetened condensed milk comes in 300ml cans.  This is roughly 10 oz in size. Not wanting to have part of a can of condensed milk left over, I adjusted the following amounts by 7/10ths and used a loaf pan approximately 9×5 inches in size. The adjusted amounts are in parentheses.

Chocolate Chip Cookie Dough Decadence

½ c. unsalted butter, softened (5 3/5 tbsp)

¾ c. packed light brown sugar (8 tbsp + 1 tsp)

1 tsp. vanilla extract (I like vanilla, so I used a light tsp)

2 c. all purpose flour (1 c. + 6 tbsp. + 1 tsp.)

1 (14 oz.) can sweetened condensed milk ( 1 300 ml. can)

2 c. mini chocolate chips (1 c. + 6 tbsp. + 1 tsp.)

1 cup semi-sweet chocolate chips (½ c. + 3 tbsp.)

1 tbsp. cream (2 tsp)

1 1/2 tsp. butter (1 generous tsp.)

Line an 8×8 inch pan with parchment paper or aluminum foil and set aside.

In a large mixing bowl, cream together butter and brown sugar until it is fluffy. This takes about 3 minutes. Add vanilla and beat until combined.

Turn the mixer to low and alternate the flour and the sweetened condensed milk until combined. Gently fold in chocolate chips.

Press the cookie dough into the bottom of the 8×8 pan. It will be sticky so lightly flour your hands if needed.

Cover your bars with plastic wrap and refrigerate for 3 hours or overnight until firm.

To make the topping, combine the cup of chocolate chips, the cream and the butter in a microwave safe bowl. Microwave for 20 seconds and stir. Repeat as needed to obtain a smooth consistency but be very careful to not overheat the chocolate or it will become stiff and grainy. Pour and spread over the top of the chilled dough and chill at least for 1 hour until firm.

Chocolate Chip Cookie Dough Decadence - A Pat & A Pinch

Herbed Gruyere and Buttermilk Scones

Herbed Gruyere and Buttermilk Scones - A Pat & A Pinch

On a cool weekend morning, I love to pull together a batch of warm savoury scones and enjoy them with a cup or two of my favourite tea.  There are different types of scones: these are based on a buttermilk biscuit recipe that results in a light scone that has many tender layers. They are quick to make and quick to eat.

Today I had some leftover gruyere which I used.  An old cheddar also makes a delicious scone.  I prefer to be able to “find” the cheese in my scones so I slice it thinly and then chop it into small pieces – each piece is roughly 1/2 x 1/4 x 1/32 inch in size.  Grated cheese disperses more consistently throughout the scone but is a little quicker to prepare if you are pressed for time.  It is a matter of choice.  If you are not a huge rosemary fan, thyme or an herbes de provence mix also work well.

These scones don’t need to be buttered, but a little extra butter doesn’t hurt them one bit. They are also nice with jam.  Alternatively, they are delicious with a little cured ham or hard sausage.  Today, I enjoyed them with some duck prosciutto and some lamb prosciutto from Oyama Sausage on Granville Island in Vancouver.

Herbed Gruyere and Buttermilk Scones - A Pat & A Pinch

Herbed Gruyere and Buttermilk Scones

2 1/2 c. flour

1 tbsp. baking powder

2 tbsp. sugar

1/4 tsp salt

1/2 c. unsalted butter, cold and cut into pieces

1/2 c. buttermilk

1/2 tsp. baking soda

1/2 c. gruyere cheese (or any hard cheese you have on hand), grated, or cut into small thin pieces

cracked black pepper

2 tbsp dried rosemary, broken down

1 egg

Preheat oven to 400 F.

Combine flour, baking powder, sugar, and salt in a bowl and cut in the flour until it is well blended and the consistency of coarse oatmeal. I recommend using your fingers rubbing the butter and flour mixture into flakes between your thumb and first two fingers. Mix the gruyere, rosemary and pepper into the flour mixture and create a well in the center. In another bowl, combine the buttermilk with the baking soda and egg and beat the mixture. Add the almost all of the liquid mixture to the the flour and butter mixture, reserving a little (about a tablespoon)  for a wash (see below).

Using a dough scraper, quickly combine the dry and wet ingredients to form what my mom calls a “shaggy mass”.  As soon as the dough begins to come together, stop.

Flour a surface and dump the contents of the dough bowl onto it.  Gather the dough bits into a rectangle, then fold the rectangle into thirds. Flatten the new rectangle gently by pressing on it.  Scoop up any loose bits with the dough scraper and toss them onto the new rectangle. Fold in thirds again. Repeat this process just until the former “shaggy mass”  forms a soft dough (no more than 6 or 7 turns). Roll out the dough to a 1″ thickness.

If you forgot to reserve a little of the liquid for a wash, beat an egg with 1 tbsp of milk and a pinch of salt to create an egg wash or just use a little heavy cream or buttermilk. Using a glass or round cookie cutter, cut the dough into rounds flouring the cutter between each cut to minimize sticking. After cutting as many pieces as possible, gather up the leftover bits, press them together forming a new rectangle, rolling it to an even 1″ thickness and cut some more rounds.  The less you can work the dough to accomplish this the better – the scones will get tougher the more the dough is worked.  Place the rounds on a baking sheet lined with a silpat or parchment (for easy cleanup) and glaze them with the wash being careful to only put wash on the tops – having wash on the sides will impair the ability of the scone to rise .  Bake for about 15 minutes, until they are golden-brown in color.

N.B. If you prefer a less savoury scone, you can replace the cheese and herbs with dried cranberries (1/2 c.) and citrus zest (a few teaspoons), currants (1/2 c.), or make them plain.