Pumpkin Seed and Chocolate Chip Cookies

My son needed some cookies for his school lunches and I really wanted to make something a little new for a change. With pumpkin season upon us, he has been keen to roast pumpkin seeds, so I thought the addition of pumpkin seeds to a chocolate chip cookie might fit the bill. I came across a recipe for Seeded Chocolate Chip Cookies by Martha Rose Schulman at the New York Times, and adapted it to what I was looking for.

Pumpkin Seed and Chocolate Chip Cookies

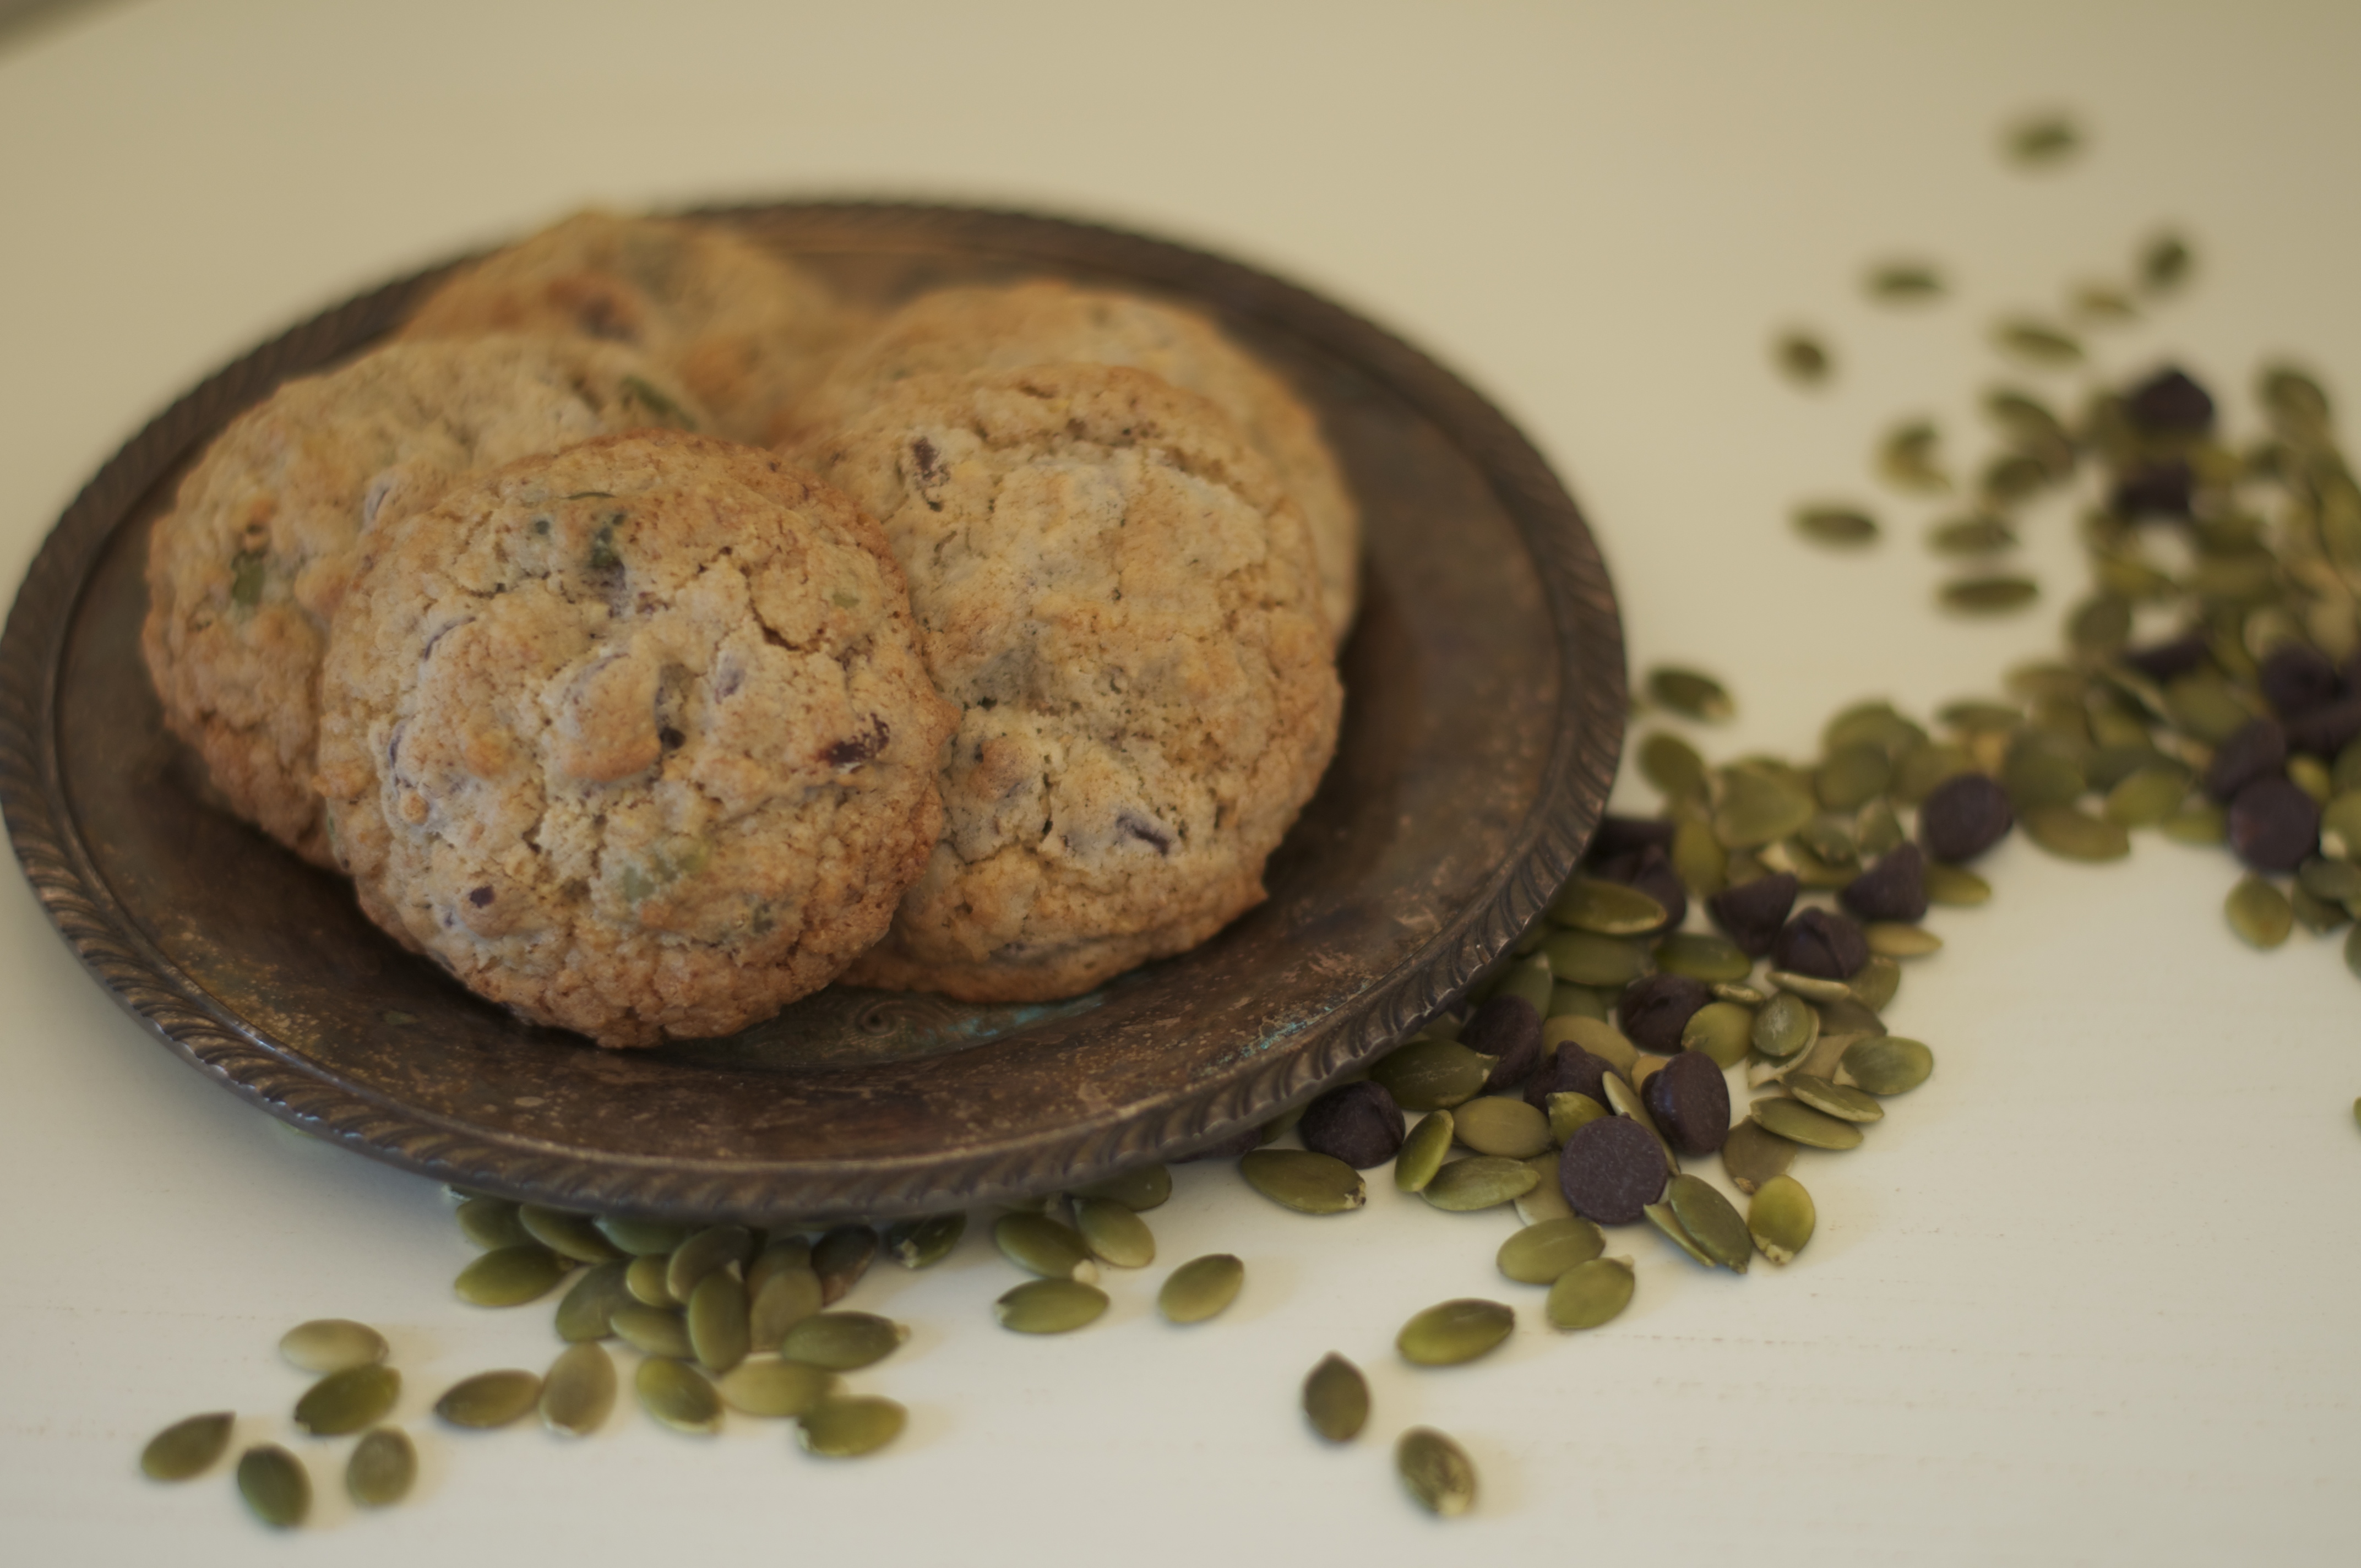
I love the result; the pumpkin seeds add a lovely crunch to the texture of the cookies, the oatmeal is scant enough that they are not like an oatmeal cookie but still have the benefit in their texture, and there is a lot of chocolate for my little chocolate lover. With my scoop, I got two dozen cookies from this recipe. Next time, I might double the recipe!

Pumpkin Seed and Chocolate Chip Cookies

6 tablespoons/48 grams whole-wheat flour

2 tablespoons ground flax seeds*

½ cup/65 grams all-purpose flour

½ teaspoon/2 grams baking soda

½ cup (1 stick)/ 115 grams unsalted butter, at room temperature

¼ cup/50 grams granulated sugar

½ cup/80 grams packed light brown sugar

1 egg

1 teaspoon vanilla/5 milliliters

¼ cup/100 grams pumpkin seeds

½ cup (scant)/50 grams rolled oats

½ teaspoon coarsely ground sea salt

1 cup/225 grams chocolate chips (or more if desired)

* If you don’t have flax seeds on hand, you can substitute with an equivalent amount of whole-wheat flour, hemp hearts, or wheat germ.

Heat oven to 350 degrees Farenheit with racks adjusted to the lower third and middle of the oven if your oven is large enough to take 2 sheets at a time. Line two baking sheets with parchment paper.

Stir the flours, ground flax seed and baking soda in a bowl and set aside.

In bowl of a standing mixer fitted with the paddle attachment, cream butter until lemony yellow, about 2 minutes. Scrape down sides of the bowl and paddle. Add the sugars. Continue creaming mixture on medium speed until it is lump free, about 1 minute. Stop mixer and scrape down sides of the bowl and the paddle.

Add the egg and vanilla and beat until fully incorporated. Scrape down sides of the bowl and paddle.

On low speed, add sifted flour mixture. Beat slowly until all of the flour mixture is incorporated. Scrape down sides of bowl. Add the seeds, oats, chocolate chips and salt and mix in.

Spoon dough by heaped tablespoons or a scoop at least 2 inches apart onto the prepared baking sheets.

Bake 9 to 14 minutes, depending on your oven, until lightly browned, turning the baking sheets from front to back halfway through the baking. If you cook two sheets at the same time, also rotate them from top to bottom and vice versa.

Remove from oven and slide parchment off the baking sheet and onto a work surface. Allow cookies to cool for at least 10 minutes before serving, or for at least 20 minutes before storing in an airtight container.

Chocolate Chip Cookie Dough Decadence

My son began first grade this week and I wanted to celebrate with a new treat for his lunch box.  Chocolate is a favourite of his and cookie dough is a highly prized item in his food choices, so these bars seemed like the perfect idea. They are adapted from a contribution to The Food Recipe Critic that was, in turn, adapted the recipe from Lifes Simple Measures, the major difference being that these are nut-free.

These bars were a huge hit, even with my dad who began as a sceptic, but they won’t be going in any lunch boxes as they wouldn’t survive the ordeals that lunchbox items must be prepared to endure.

I was a little concerned that the dough might be too soft, so I was careful about the amount of sweetened condensed milk that I added. In the end, I chose not to scrape out the can of condensed milk, leaving a good tablespoon in the can. Even at that, the dough is quite soft when not fully chilled. Consequently, I wouldn’t serve these bars on a hot day when they had to sit out of the fridge for any time.

Chocolate Chip Cookie Dough Decadence - A Pat & A Pinch

In Canada, sweetened condensed milk comes in 300ml cans.  This is roughly 10 oz in size. Not wanting to have part of a can of condensed milk left over, I adjusted the following amounts by 7/10ths and used a loaf pan approximately 9×5 inches in size. The adjusted amounts are in parentheses.

Chocolate Chip Cookie Dough Decadence

½ c. unsalted butter, softened (5 3/5 tbsp)

¾ c. packed light brown sugar (8 tbsp + 1 tsp)

1 tsp. vanilla extract (I like vanilla, so I used a light tsp)

2 c. all purpose flour (1 c. + 6 tbsp. + 1 tsp.)

1 (14 oz.) can sweetened condensed milk ( 1 300 ml. can)

2 c. mini chocolate chips (1 c. + 6 tbsp. + 1 tsp.)

1 cup semi-sweet chocolate chips (½ c. + 3 tbsp.)

1 tbsp. cream (2 tsp)

1 1/2 tsp. butter (1 generous tsp.)

Line an 8×8 inch pan with parchment paper or aluminum foil and set aside.

In a large mixing bowl, cream together butter and brown sugar until it is fluffy. This takes about 3 minutes. Add vanilla and beat until combined.

Turn the mixer to low and alternate the flour and the sweetened condensed milk until combined. Gently fold in chocolate chips.

Press the cookie dough into the bottom of the 8×8 pan. It will be sticky so lightly flour your hands if needed.

Cover your bars with plastic wrap and refrigerate for 3 hours or overnight until firm.

To make the topping, combine the cup of chocolate chips, the cream and the butter in a microwave safe bowl. Microwave for 20 seconds and stir. Repeat as needed to obtain a smooth consistency but be very careful to not overheat the chocolate or it will become stiff and grainy. Pour and spread over the top of the chilled dough and chill at least for 1 hour until firm.

Chocolate Chip Cookie Dough Decadence - A Pat & A Pinch

Spiced Apple Butter

Spiced Apple Butter - A Pat & A Pinch

My parents live on a property that has the remnants of an old orchard.  The apple trees are larger than ideal and you can tell that they have witnessed a lot of history but they still produce apples.  This weekend the Gravensteins were ready to be picked. Gravensteins are a tasty eating apple, but they aren’t any good for pies. With a bumper crop, they needed to be used and what better solution than apple butter.

Choose a day when you can be home all day to make apple butter: It takes a long time to cook! Mine cooked all day – a good 12 hours in total but I think that that was largely due to the volume I made which necessitated starting it on the cooktop and then shifting it to the oven. It needs to be stirred regularly, but other than the stirring it requires little attention. If I was making a smaller batch, I would simply use the oven or a crock pot – it is so much less effort and requires so much less attention!

I can’t give you a specific recipe for apple butter – it depends on what type(s) of apples you have and how many of them you have.  The good news, however, is that you really don’t need a recipe.

I peeled, sliced  and cored my apples using a peeling and coring gizmo like this.  It yields a spiral sliced apple that I then cut into quarters.  If you have a food mill, you can slice your apples whole with peel and then run the cooked mixture through the mill, but I find beginning with prepared apples easier.

I filled a heavy bottomed 17 litre stock pot to within 2 inches of the top with the apples and added 2 litres of some soft apple cider from a previous year’s bounty that we keep frozen until needed. You could also simply start with a little water or commercial apple juice. I put the pot on low on the cooktop and began to let it cook. The fruit broke down into an applesauce quite quickly.  Gravensteins do break down easily but if you have an apple that doesn’t, you can easily break it down with an immersion blender or with a food mill.

I added spices to taste: my choices were cardamom, cinnamon, cloves and some ground ginger.  For my first batch, I used whole spices tied up in cheese cloth and then supplemented with ground spices.  For the second batch, I went straight to the ground spices. Remember that the apples are going to be reduced by at least half, so the spices you add will concentrate.  You can always add more spices later in the process if you find that you would like more.

As the fruit cooked down, I tasted it for sweetness and added brown sugar to my taste. Again, it is important to remember that the apples will reduce, so be careful not to over sweeten.

When my mixture had reduced by about half, I put it into two uncovered dutch ovens which I placed in a 250 degree F oven.  I continued to cook down the mixture, but in the oven it only needed to be stirred hourly.

The apple butter is done when it is very thick. You can almost slice the mixture and it will retain the “cut”.  By the time it reaches this consistency it is a lovely rich reddish brown colour.

I poured the hot mixture into hot canning jars, filling them to within a quarter inch of the top. I then quickly placed the lids on top.  All of the jars sealed without the need for an additional canning process.

My son loves this on pancakes, but I use it liberally on anything and everything that lends itself well to jam.

Spiced Apple Butter - A Pat & A Pinch

Blackberry & King Apple Crumble

My parent’s home on Salt Spring Island has a small orchard and is, like much of the island, surrounded by blackberry bushes. The blackberries are perfect for the picking this time of the year and this year, our gravenstein trees are ready to harvest. While the gravensteins aren’t the best for baking with, we keep a supply of apples from our old King apple. (This year for fathers’ day, I got my dad a new one which I have since named B.B. King – these are his favourite and I thought the name was rather clever). The other trees in the orchard are great for cider and should be ready to harvest within the next month.

We have a mechanism which cores and slices the apples as you turn the crank and which gets a lot of use this time of year (apple butter to come). If you are preparing a lot of apples, these are a godsend. To preserve our extra apples, we then freeze the cored and sliced apples for crumbles to come.

This crumble (or crisp as you may wish to call it) is a slightly modified version of Betty Crocker’s Apple Crisp recipe, the main modification being blackberries.

Blackberry and King Apple Crumble - A Pat & A Pinch

Blackberry and King Apple Crumble

3 cups sliced apples (we use king apples for their perfect tartness and texture)

5 cups blackberries

3 tbsp corn starch

1 1/2 c. brown sugar

1 c. flour

1 c. oats

1 1/2 tsp. ground cinnamon

1 1/2 tsp. ground nutmeg (fresh – if you want to know if your nutmegs are fresh enough, prick them with a pin and oil ought to ooze out)

2/3 c. butter

1 c. chopped pecans

Preheat the over to 375 F. Fill a greased 9 x 13 inch glass dish with the fruit. Sprinkle the cornstarch over the fruit. Mix together the sugar, flour, oats, cinnamon, nutmeg, and work the butter into the dry ingredients with your fingers.  Mix in the pecans and spread this crumb mixture gently over the fruit.

Bake until the top is golden brown, the apples are tender, and the fruit mixture is bubbling (approx. 40 minutes). If the top begins too brown too much before the fruit is cooked, gently lay a piece of parchment over the pan to slow the browning.

Blackberry and King Apple Crumble - A Pat & A Pinch

Herbed Gruyere and Buttermilk Scones

Herbed Gruyere and Buttermilk Scones - A Pat & A Pinch

On a cool weekend morning, I love to pull together a batch of warm savoury scones and enjoy them with a cup or two of my favourite tea.  There are different types of scones: these are based on a buttermilk biscuit recipe that results in a light scone that has many tender layers. They are quick to make and quick to eat.

Today I had some leftover gruyere which I used.  An old cheddar also makes a delicious scone.  I prefer to be able to “find” the cheese in my scones so I slice it thinly and then chop it into small pieces – each piece is roughly 1/2 x 1/4 x 1/32 inch in size.  Grated cheese disperses more consistently throughout the scone but is a little quicker to prepare if you are pressed for time.  It is a matter of choice.  If you are not a huge rosemary fan, thyme or an herbes de provence mix also work well.

These scones don’t need to be buttered, but a little extra butter doesn’t hurt them one bit. They are also nice with jam.  Alternatively, they are delicious with a little cured ham or hard sausage.  Today, I enjoyed them with some duck prosciutto and some lamb prosciutto from Oyama Sausage on Granville Island in Vancouver.

Herbed Gruyere and Buttermilk Scones - A Pat & A Pinch

Herbed Gruyere and Buttermilk Scones

2 1/2 c. flour

1 tbsp. baking powder

2 tbsp. sugar

1/4 tsp salt

1/2 c. unsalted butter, cold and cut into pieces

1/2 c. buttermilk

1/2 tsp. baking soda

1/2 c. gruyere cheese (or any hard cheese you have on hand), grated, or cut into small thin pieces

cracked black pepper

2 tbsp dried rosemary, broken down

1 egg

Preheat oven to 400 F.

Combine flour, baking powder, sugar, and salt in a bowl and cut in the flour until it is well blended and the consistency of coarse oatmeal. I recommend using your fingers rubbing the butter and flour mixture into flakes between your thumb and first two fingers. Mix the gruyere, rosemary and pepper into the flour mixture and create a well in the center. In another bowl, combine the buttermilk with the baking soda and egg and beat the mixture. Add the almost all of the liquid mixture to the the flour and butter mixture, reserving a little (about a tablespoon)  for a wash (see below).

Using a dough scraper, quickly combine the dry and wet ingredients to form what my mom calls a “shaggy mass”.  As soon as the dough begins to come together, stop.

Flour a surface and dump the contents of the dough bowl onto it.  Gather the dough bits into a rectangle, then fold the rectangle into thirds. Flatten the new rectangle gently by pressing on it.  Scoop up any loose bits with the dough scraper and toss them onto the new rectangle. Fold in thirds again. Repeat this process just until the former “shaggy mass”  forms a soft dough (no more than 6 or 7 turns). Roll out the dough to a 1″ thickness.

If you forgot to reserve a little of the liquid for a wash, beat an egg with 1 tbsp of milk and a pinch of salt to create an egg wash or just use a little heavy cream or buttermilk. Using a glass or round cookie cutter, cut the dough into rounds flouring the cutter between each cut to minimize sticking. After cutting as many pieces as possible, gather up the leftover bits, press them together forming a new rectangle, rolling it to an even 1″ thickness and cut some more rounds.  The less you can work the dough to accomplish this the better – the scones will get tougher the more the dough is worked.  Place the rounds on a baking sheet lined with a silpat or parchment (for easy cleanup) and glaze them with the wash being careful to only put wash on the tops – having wash on the sides will impair the ability of the scone to rise .  Bake for about 15 minutes, until they are golden-brown in color.

N.B. If you prefer a less savoury scone, you can replace the cheese and herbs with dried cranberries (1/2 c.) and citrus zest (a few teaspoons), currants (1/2 c.), or make them plain.


Bottom Crust Plum Crumble

Before plum season is upon us, I thought that I would share this tasty plum desert recipe that my family has been making for years. The dish is more like a tart than a crumble when completed, but relies on a crumble mixture in its composition.  I used frozen plum halves from last season, but fresh plums are easier to work with. If you choose to make it with frozen plums, they do work just as well as fresh ones in this recipe.  I recommend with frozen plums only slightly defrosting them before slicing – they are extremely hard to work with once fully defrosted.

If you have access to lots of plums and want to freeze some, cut them in half, remove the pits and lay separated on a baking sheet.  Place the baking sheet in your freezer. Once frozen, pop the frozen plum halves into a ziplock removing as much air as possible and return to the freezer.

Bottom Crust Plum Crumble - A Pat & A Pinch

1 1/4 cups plus 1 tablespoons white sugar

1/4 teaspoon salt

1/2 cup (1 stick) unsalted butter, chilled and cut into small pieces

1 1/4 cups flour

3/4 teaspoon cinnamon

1/4 teaspoon baking powder

2 eggs

1/2 cup heavy cream

1 1/2 teaspoons almond extract

1/2 teaspoon vanilla extract

1 1/2 pounds (approximately 12) dark plums, pitted and cut into eighths (cut smaller plums into sixths)

Heavy cream for serving, whipped or unwhipped

Preheat oven to 350 degrees F.

Combine 1 cup of the sugar and the salt; cut in the butter until the mixture resembles a coarse meal. Stir in the flour.

Set aside half the mixture. Add the cinnamon, baking power and 1 egg to the other half. Mix until well blended. The dough will be quite sticky. Layer the bottom of a 10 inch tart pan with the dough (just the bottom and not up the sides) by dropping teaspoons of the dough around the perimeter of the pan and then the centre, using a spatula to join and spread the dough evenly across the bottom. Bake until just starting to turn golden, approximately 10 minutes.

While the pastry is baking, whisk together 1/4 cup of the sugar, the remaining egg, the cream and the almond and vanilla extracts.

Remove the pastry from the oven, leaving the oven on, and spread the plum slices on top. I find it best to arrange the slices in circles beginning from the rim of the dish and working toward the centre. Pour the cream mixture over top and sprinkle with the reserved butter flour mixture. Sprinkle with the remaining tablespoon of sugar and return to the oven baking until the topping is nicely browned, 20-30 minutes.

Serve warm or cold with whipped cream or unwhipped whipping cream, as preferred.